Programming Guide#
This document will help you further understand Mobilint’s qb Runtime (also known as maccel) and utility (mobilint-cli).
This section includes explanations for the core components in the library as well as the typical inference process.
Warning
To use ARIES-powered devices, you must first have the driver and runtime library installed in your system. To do this, refer to Driver, Runtime Library installation.
Mobilint Runtime Library Features#
Mobilint’s runtime library provides a flexible and robust API for integrating Mobilint NPUs into your C++ or Python applications. Below are key features and supported behaviors:
C++: The C++ library supports defensive programming through StatusCode.
Python: Each step handles success or failure internally, immediately raising an error and terminating execution if an issue occurs.
Currently supports
INT8andfloat32input data types for inference.qb Runtimesupports high-dimensional data inference using NDArray type. Input data using NDArray can be structured as shown below.mobilint::StatusCode sc; mobilint::NDArray<float> input({224, 224, 3}, sc);
Tip
For detailed initialization methods of
NDArray, please refer to API references.
Inference Process#
To utilize runtime library, an MXQ file is required. An MXQ (Mobilint ExeCUtable) file refers to the optimized model file format compiled on qb Compiler, Mobilint’s official compiler.
Running inference on Mobilint’s NPU using the qb Runtime involves four essential steps:
Load the NPU device. (Step 1:
Accelerator)Load the compiled model (MXQ file). (Step 2:
Model)Upload model to the NPU device. (Step 3: Pass
Modelinformation to theAccelerator)Run inference using user input. (Step 4: Run inference using passed
Modelinformation and input data)
In Mobilint’s qb Runtime, abstracted objects Accelerator and Model are used throughout the steps.
Step 1: Accelerator#
The Accelerator object represents the NPU device to be used. It abstracts a single device identified by the number appended to the device name (e.g., /dev/aries0 -> Accelerator0, /dev/aries1 -> Accelerator1). If no specific number is provided in Accelerator initialization, NPU device 0 is used by default.
// C++ example
mobilint::StatusCode sc;
auto acc = mobilint::Accelerator::create(0, sc);
if (!sc) {
	fprintf(stderr, "Error code %d\n", int(sc));
	exit(1);
}
# Python example
acc = maccel.Accelerator(0)
Step 2: Model#
The Model object represents a model contained in an MXQ file. Upon creation, it immediately reads the MXQ file and stores the relevant information. It then uses the Accelerator object to run inference using this model.
// C++ example
auto model = mobilint::Model::create(MXQ_FILE_PATH, sc);
if (!sc) {
	fprintf(stderr, "Error code %d\n", int(sc));
	exit(1);
}
# Python example
model = maccel.Model(MXQ_FILE_PATH)
Step 3: Pass Model information to the Accelerator.#
Pass the information with the launch() method of Model object.
Step 4: Run inference using passed Model information and input data#
Get the input data and run inference using the mobilint::Model::infer() method of Model object.
// C++ example
sc = model->launch(*acc);
if (!sc) {
	fprintf(stderr, "Error code %d\n", int(sc));
	exit(1);
}

auto result = model->infer({INPUT}, sc);
if (!sc) {
	fprintf(stderr, "Error code %d\n", int(sc));
	exit(1);
}
# Python example
model = maccel.Model(MXQ_FILE_PATH)
result = model.infer([INPUT])
Inference Scenario#
// C++ example
#include "maccel/maccel.h"

const char* MXQ_PATH = "path/to/mxq.mxq"

int main() {
	mobilint::StatusCode sc;
	auto acc = mobilint::Accelerator::create(sc);        // Step 1
	if (!sc) exit(1);

	auto model = mobilint::Model::create(MXQ_PATH, sc);  // Step 2
	if (!sc) exit(1);

	sc = model->launch(*acc);                            // Step 3
	if (!sc) exit(1);

	// Some preprocessing for input data

	auto result = model->infer(preprocessed_input, sc);  // Step 4
	if (!sc) exit(1);
}
## Python example
import maccel

MXQ_PATH = "path/to/mxq.mxq"

## Step 1
acc = maccel.Accelerator()
## Step 2
model = maccel.Model(MXQ_PATH)
## Step 3
model.launch(acc)

## Some preprocessing for input data

## Step 4
result = model.infer(preprocessed_input)
Compile C++ source code#
Linux/Ubuntu#
The compilation process will vary depending on how the runtime library was installed.
If the library was installed system-wide (installation via apt or
sudo make install), compile with:g++ -o {outfile_name} {source_code} -lmaccel
If you’re using the runtime library without installation (using downloaded file from the Download Center):
g++ -o {outfile_name} -I{path/to/include} -L{path/to/library} {source_code} -lmaccel
Windows#
On Windows, the runtime library is used without installation. You must manually specify include and the library paths (lib) during compilation.
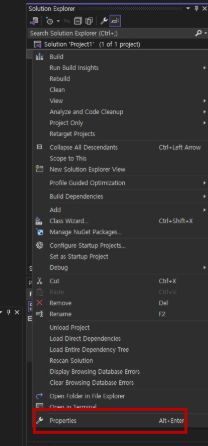
Open the Visual Studio project you are working on.
Click the button below to modify the project settings.
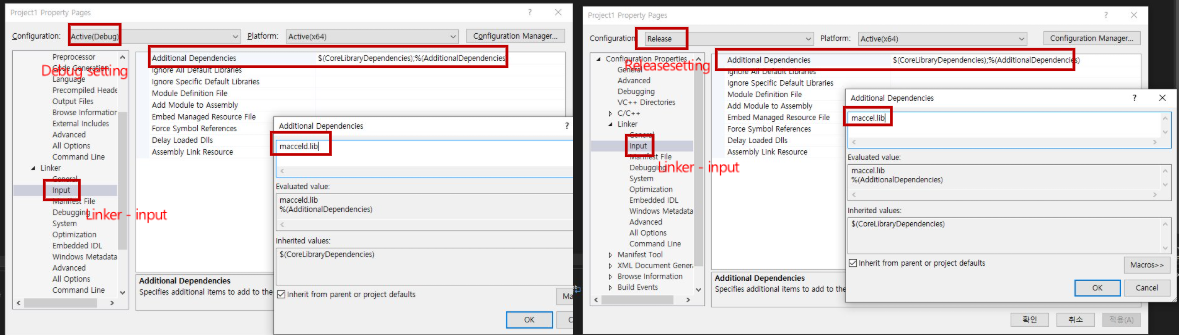
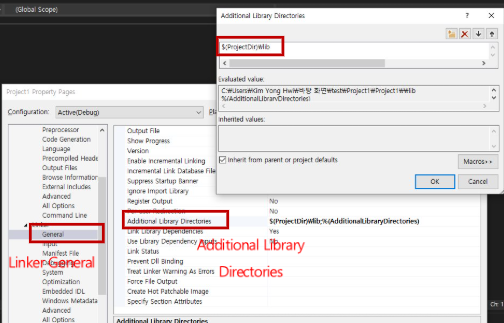
As shown in the two images below, add the
includeandlibfolders in the C/C++ setting and Linker setting, respectively.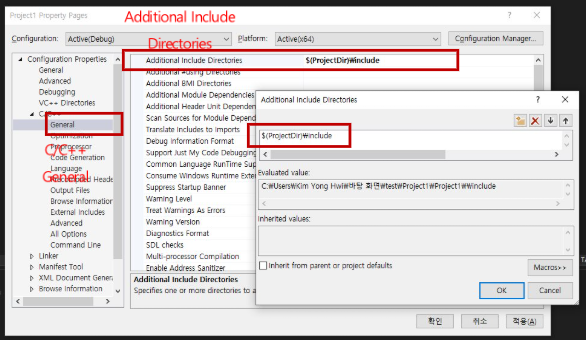
Add the following settings according to the build mode. Use
maccel.libin Release mode andmacceld.libin Debug mode.