Driver Installation#
The driver is required for enabling communication between your host system and the installed NPU device. It is available on Linux (Ubuntu) or Windows systems.
Attention
Please complete driver installation before proceeding with runtime setup.
Please check the compatible runtime and firmware versions here
Table of Contents#
Linux#
Option 1: Installing via APT on Ubuntu#
Mobilint provides a driver package for Ubuntu that can be installed using the APT package manager. You may also build the driver from source for use with other Linux distributions.
Requirements#
Before starting, ensure the following:
Your system is running Ubuntu 20.04, or later (x86-64 or ARM64)
You have sudo/root privileges
The following build tools are installed:
sudo apt install linux-headers-$(uname -r) build-essential
Installation Process#
Add the Mobilint APT repository to your system before proceeding with the installation.
# Add Mobilint's official GPG key:
sudo apt update
sudo apt install ca-certificates curl
sudo install -m 0755 -d /etc/apt/keyrings
sudo curl -fsSL https://dl.mobilint.com/apt/gpg.pub -o /etc/apt/keyrings/mblt.asc
sudo chmod a+r /etc/apt/keyrings/mblt.asc

# Add the repository to apt sources:
printf "%s\n" \
    "deb [signed-by=/etc/apt/keyrings/mblt.asc] https://dl.mobilint.com/apt \
    stable multiverse" \
    "deb [signed-by=/etc/apt/keyrings/mblt.asc] https://dl.mobilint.com/apt \
    $(. /etc/os-release && echo "${UBUNTU_CODENAME:-$VERSION_CODENAME}") multiverse" | \
    sudo tee /etc/apt/sources.list.d/mobilint.list > /dev/null

# Update available packages
sudo apt update
Install the driver using the command below.
sudo apt install aries-driver
Warning
If Secure Boot is enabled on your PC, driver will not be installed. Please disable Secure Boot and reinstall driver, or refer to Installation on Secure Boot.
You can check whether Secure Boot is enabled using the following command.
$ mokutil --sb-state
SecureBoot enabled
Once the driver installation is complete, reboot the system.
Verifying Installation#
After reboot, check that the device node has been created:
ls -al /dev/aries*
If your NPU is recognized, you should see output listing device nodes such as /dev/aries0.

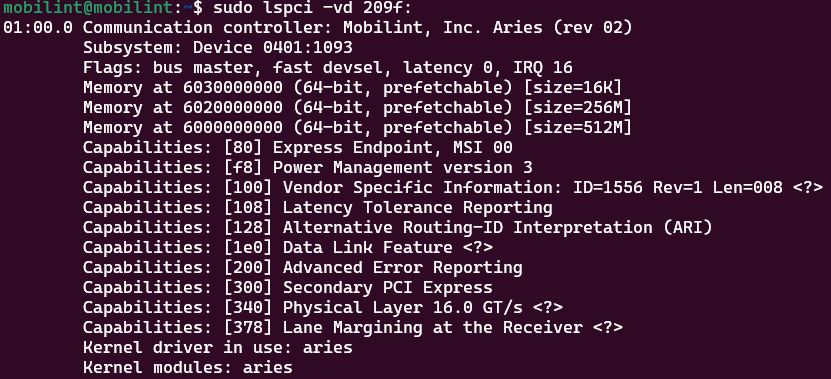
If not, confirm the NPU is recognized on the PCI bus:
sudo lspci -vd 209f:
If this command does not return an output like the following image, check the hardware connection (power, PCIe seating) or try another slot.
If you are unable to install the driver using the provided method, please follow the alternative installation method described below. Or contact our technical support team at https://discuss.mobilint.com.
Installation on Secure Boot#
To install the driver in an environment where Secure Boot is enabled, you need to register the driver’s MOK (Machine Owner Key) in the system.
Warning
MOK registration cannot be performed in a remote work environment; it must be done by directly accessing the system with display and keyboard.
The registration procedure is as follows:
First, when you enter the installation command, the following message will appear.
$ sudo apt install aries-driver
* READ ME! *****************************************************************
*
* Installation Instruction for Secure Boot Mode
*
* You are now installing aries driver on secure boot mode. MOK (Machine Owner Key) should be enrolled to the system first for succesful driver installation. If you haven't enrolled MOK yet, make sure that you are not accessing the system remotely (via ssh) as you need to enroll the MOK on system booting. Follow the instructions below.
*
* 1. You will be prompted to set password for MOK key enrollment. Set the password (which should be 8 to 16 characters) and remember it for step 2.
* 2. Reboot to enroll MOK to the system. Blue screen will pop up automatically for MOK enrollment. Enroll the key using the password you set in step 1. If you failed to enroll MOK for any reason, move on to step 3.
* 3. Reinstall the driver: \"sudo apt install aries-driver\".
* 4. If the installation was successful, check whether the driver is loaded: \"lsmod | grep aries\". If not, follow the instruction from step 1 again.
*
*********************************
Enter the MOK password following the instructions. The password must be between 8 and 16 characters.
[Instruction] Set password for MOK enrollment
input password:
input password again:
After entering the MOK password, you may see an error log indicating installation failure along with a message instructing you to reboot the system and reinstall the driver. Then, reboot the system.
[Instruction] Enroll MOK on reboot. Then reinstall the driver.
dpkg: error processing package aries-driver (--install):
 installed aries-driver package post-installation script subprocess returned error exit status 1
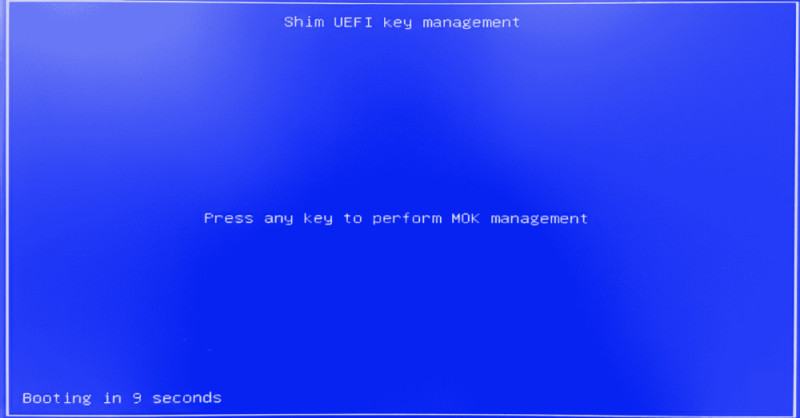
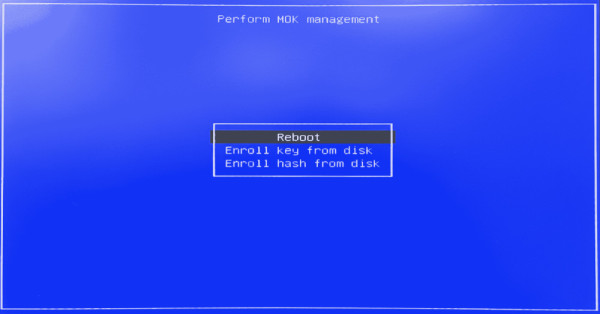
When the system reboots, a blue screen titled “Shim UEFI Key Management” will appear. Then, press any key to proceed to the MOK configuration.
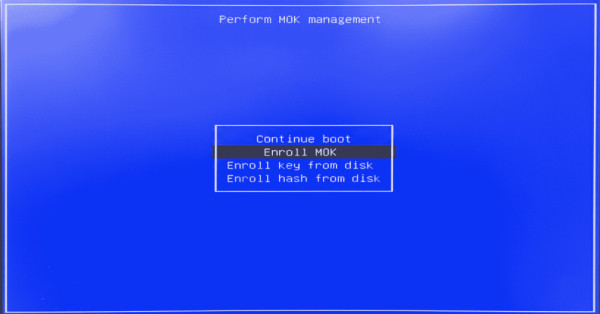
When the “Perform MOK Management” screen appears, select “Enroll MOK”.
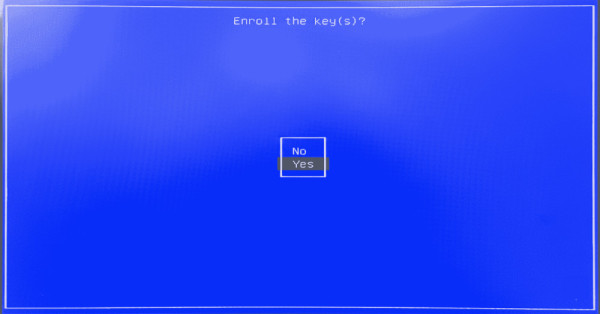
When the “Enroll the key(s)?” screen appears, select “Yes”.
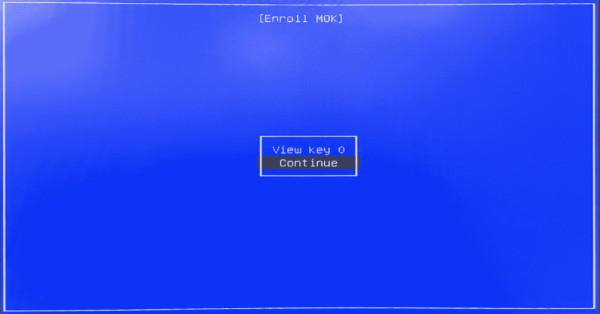
When the “Enroll MOK” screen appears, select “Continue”.
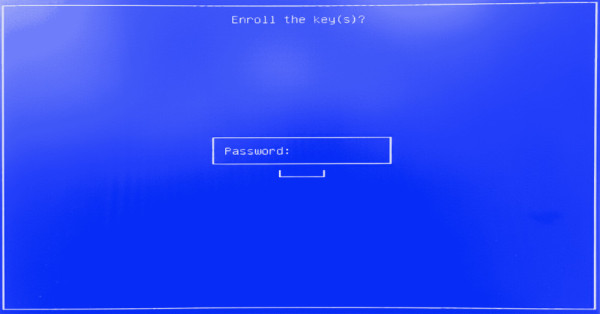
Enter the MOK password that you set during the driver installation by apt.
After the MOK registration is complete, select “Reboot” to restart the system.
Once the system reboots after completing MOK registration, try to reinstall the driver. The installation should now proceed successfully.
sudo apt install aries-driver
Note
If you enter the MOK password incorrectly during the MOK registration process, installation command will request you to set a new MOK password. After setting the new password, reboot the system and repeat the MOK registration process.
Option 2: Manual Download (Other Linux distributions)#
Building a kernel module requires kernel headers and a compiler, and the specific requirements may vary significantly depending on your Linux distribution and environment.
The following instructions illustrate the required steps for Ubuntu to install prerequisites using APT; please refer to them and adapt accordingly for your own system.
Requirements#
Download the appropriate driver from Mobilint’s official Download Center.
Before building the driver, make sure the following packages are installed:
sudo apt install linux-headers-$(uname -r) build-essential
Installation Process#
The driver package available from Download Center is provided in a form that allows you to build and use the kernel module direclty. If you intend to use it as a loadable module, you can simply build it using make and insert or remove the kernel module as shown below.
## Build the kernel
make

## insert the kernel module
sudo insmod aries.ko
remove the kernel module
You can remove the kernel module after insert with following command:
sudo rmmod aries
Optional: Built-in Kernel Integration#
If you want to include the driver as part of your custom Linux kernel (built-in module), refer to your distribution’s kernel build and packaging process.
If you are unable to install the driver using the instructions provided, please contact our technical support team at https://discuss.mobilint.com.
Windows#
Mobilint provides a signed KMDF driver for 64-bit Windows 10/11 (Build 19041 or later).
Requirements#
Windows 10 or 11 (64-bit), Universal (Windows 10.0.19041)
Windows Update may be required to reach minimum supported version
Download the appropriate driver from Mobilint’s official Download Center.
Note: The provided driver package includes the following files:
mobilint_pcie.sys- Driver binary filemobilint_pcie.inf- Driver installation information filemobilint_pcie.cat- Driver signing catalog file
Installation Process#
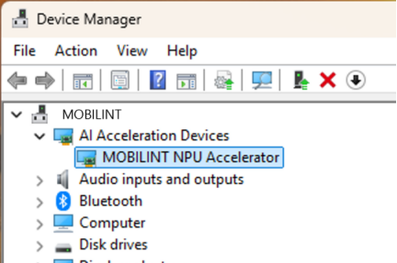
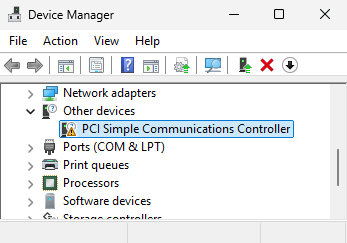
If the card has been properly inserted into the PC, the Device Manager should look like the image below:
Note
Before the driver is installed, the device will appear under “Other Devices” as “PCI Simple Communications Controller”.
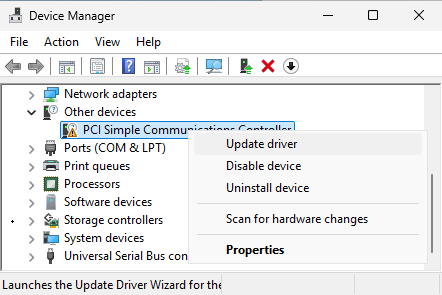
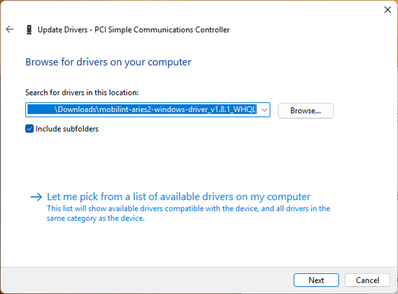
In Device Manager, click the “Update Driver” button.
Proceed by selecting
Browse my computer for drivers.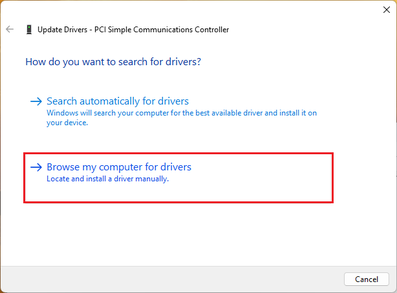
Locate the folder containing the driver files.
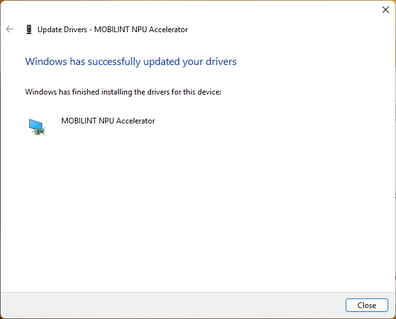
Once installation is complete, you will see that the driver has been successfully installed, as shown below.