
(Basic) Running Pre-Compiled ResNet50#
This tutorial demonstrates how to run a precompiled ResNet50 model on Mobilint NPUs using the provided runtime package.
It includes:
Examples for ARIES-based systems (MLA100 PCIe / MXM / MLX-A1)
Cross-compilation setup for REGULUS
Prerequisites#
Before starting, ensure the following components are installed on your system:
Mobilint NPU hardware:
ARIES (MLA100 PCIe / MLA100 MXM / MLX-A1), or
REGULUS SoC
Driver
Runtime Library
For ARIES-based form factors#
Preparing the Example Files#
How you obtain the example files depends on your operating system. In both cases the package ships compiled .mxq models per device, and the example scans the NPU devices in the system and picks the matching resnet50_{device}.mxq file automatically.
Linux#
Ensure your driver and runtime environments are ready.
Download runtime library package file from Download Center.
Unzip the runtime library package and navigate to the ResNet50 directory:
cd {YOUR_DOWNLOAD_DIR}/qbruntime_v{RUNTIME_VERSION_NUMBER}_arch/qbruntime/resnet50
You should see the following files:
qbruntime_v{RUNTIME_VERSION_NUMBER}_arch/qbruntime/resnet50/
├── ILSVRC2012_val_00000001.JPEG  # Example image
├── resnet50.cc                   # C++ inference code
├── resnet50.py                   # Python inference code
├── resnet50_{device}.mxq         # Compiled ResNet50 models, one per device
├── stb_image.h                   # library for image load
└── stb_image_resize.h            # library for image processing
Windows#
Complete the installation with the runtime library installer. See Runtime Library Installation - Windows for the steps.
Note
The Windows example is available starting from runtime library version 1.4.0.
Go to the example folder under the installation directory. With the default installation path, it is:
C:\Users\{user}\AppData\Local\Programs\mobilint-qb-runtime-sdk\examples\resnet50The example folder contains the following files:
examples/resnet50/
├── ILSVRC2012_val_00000001.JPEG  # Example image
├── resnet50.cc                   # C++ inference code
├── resnet50.py                   # Python inference code
├── resnet50.sln                  # Visual Studio solution
├── resnet50.vcxproj              # Visual Studio project
├── resnet50_aries-rb.mxq         # Compiled ResNet50 models, one per device
├── resnet50_regulus-ra.mxq
├── resnet50_regulus-rb.mxq
├── resnet50_regulus-rb-usb.mxq
├── stb_image.h                   # library for image load
└── stb_image_resize.h            # library for image processing
C++ Code (resnet50.cc)#
How you compile the code depends on your operating system.
Linux#
Compile the code following this document.
g++ -o resnet50 resnet50.cc -lqbruntime
Execute compiled binary.
Windows#
The Visual Studio solution (resnet50.sln) in the example folder already points to the header path (..\..\include) and the library path (..\..\lib), relative to the installation directory, so you can build without setting the paths yourself.
Open
resnet50.slnin Visual Studio.Warning
Select the x64 platform in the solution configuration. 32-bit (
x86) is not supported.Note
The project targets platform toolset v142 (Visual Studio 2019). Visual Studio 2022 may prompt you to retarget the solution when you open it.
Choose a configuration and build. The Release configuration links
qbruntime.liband the Debug configuration linksqbruntimed.lib; a post-build step copies the matching DLL into the example folder. The executable is created atx64\{configuration}\resnet50.exe.Run the example from Visual Studio. The code reads the
.mxqmodel and the image file from the working directory, so the working directory must be the example folder. Run the built executable from the example folder as well.
Python Code (resnet50.py)#
The steps are the same on Linux and Windows.
Make sure runtime library python package
qbruntimeis installed in your python library by referring to this document.Install
opencv-pythonpackage for image processing.pip install opencv-python
Run the example code from the example folder.
python resnet50.py
For REGULUS#
Note
REGULUS comes with driver and runtime library pre-installed, so no additional installation is required.
Programs running on REGULUS must be built in a cross-compilation environment so that they can execute on ARM CPU within REGULUS. After build, compiled program should be uploaded to REGULUS for execution.
Download
regulus-release_vX.X.X.tar.gzfile from Mobilint Download Center.Unzip the file, then run
install-regulus-toolchain.shscript and press Enter to install cross-compilation toolchain:$ cd regulus-release_vX.X.X $ ./install-regulus-toolchain.sh # ==> type "enter"
Note
Running the above command will create a directory at “/opt/crosstools/mobilint/Y.Y.Y/X.X.X”.
Activate cross-compilation environment with following command:
$ source /opt/crosstools/mobilint/X.X.X/<version>/environment-setup-cortexa53-mobilint-linux
Download ResNet50 package from demo github repository and build it:
$ git clone https://github.com/mobilint/regulus-npu-demo.git
$ cd regulus-npu-demo/image-classification-resnet50
$ make
Upload generated binary to REGULUS device and run it:
./resnet50
Epilogue: Understanding the NPU Application Structure#
Once you’ve confirmed the ResNet50 example runs successfully on your NPU, you can use this implementation as a starting point to develop your own AI applications.
The following diagram outlines the typical structure of an NPU application, highlighting which steps are handled by the runtime and which require custom development:
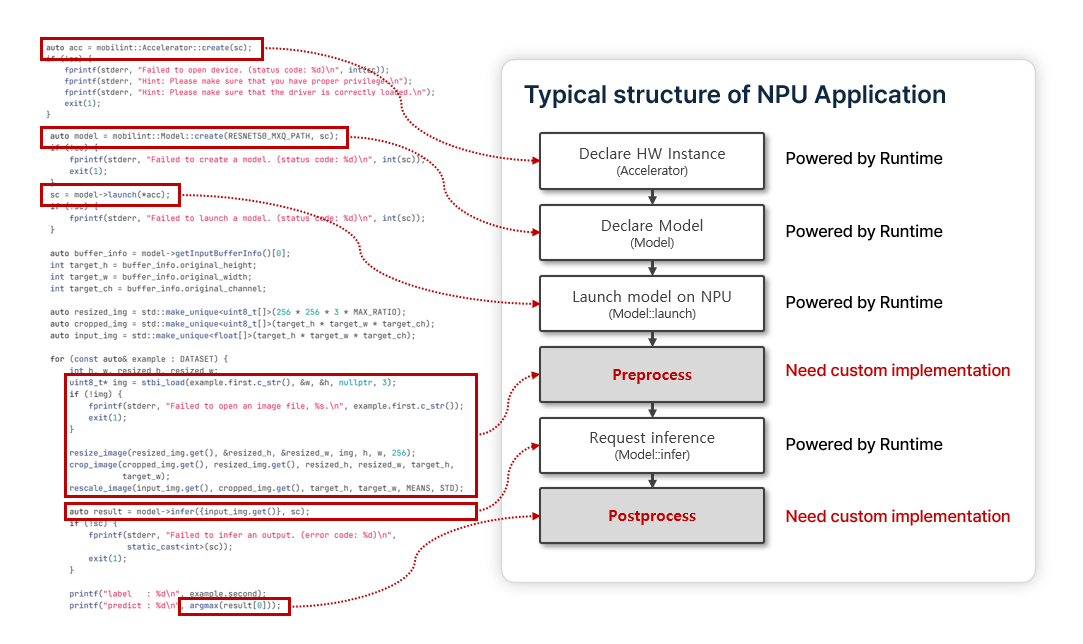
This ResNet50 example is a minimal demonstration. To bring your application closer to production, consider implementing advanced optimization techniques, such as multithreading and non-blocking I/O.
See also
The optimization techniques vary significantly depending on the application and its environment. For more guidance, see the Advanced Usage section.